
What is Custom Access Control?
Celiveo administrators are able to force a customized OXPd Authorization Agent Configuration – also called Authorization Proxy – on HP FutureSmart printers.
This allows to define which Printer functions are controlled by Celiveo.
How to apply Custom Access Control?
Celiveo has a default Authorization proxy configured on the printer by the solution. The Web Admin allows the download of the default XML configuration file for an admin to customize it and upload it back to the Celiveo Web Admin in order to be deployed on printers.
To do so:
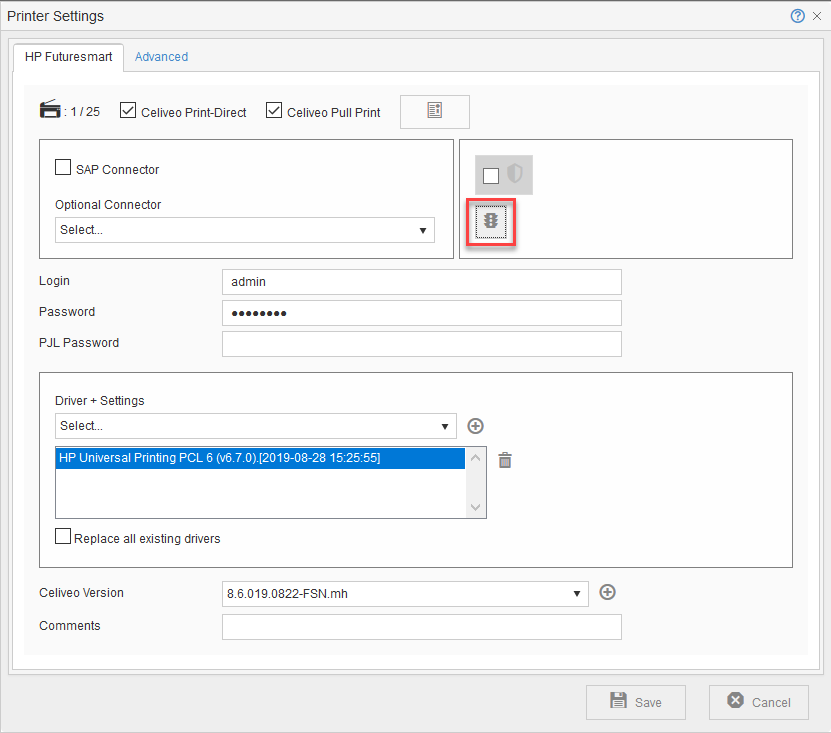
- In the Web Admin, select your HP FutureSmart printer and click the Printer Settings
![]() icon.
icon. - The Printer Settings window displays.
![]()
- To enable Custom Access Control, click the
![]() icon.
icon. - The options display:
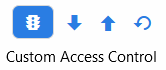
Download ![]() icon – This allows the download of the current Celiveo OXPd Authorization Agent configuration. If the Celiveo OXPd Authorization Agent is disabled, a sample file will be downloaded as a reference. This file can be edited with custom configuration and then uploaded to the Web Admin.
icon – This allows the download of the current Celiveo OXPd Authorization Agent configuration. If the Celiveo OXPd Authorization Agent is disabled, a sample file will be downloaded as a reference. This file can be edited with custom configuration and then uploaded to the Web Admin.
Note: The sample file will not reflect any setting applied on the Printer EWS or via any third party software such as HP WebJetAdmin.
Upload ![]() icon – This allows to upload the modified Access Control file. This requires the printer to be synchronized again for the new settings to be applied.
icon – This allows to upload the modified Access Control file. This requires the printer to be synchronized again for the new settings to be applied.
Reset ![]() icon – This will remove the Celiveo OXPd Authorization Agent. This also requires a new printer synchronization.
icon – This will remove the Celiveo OXPd Authorization Agent. This also requires a new printer synchronization.
Note: If the Reset option is used, the Celiveo Access Rules will not be applied on this printer. The user can then configure Access Control on the Printer EWS or using any third-party software such as WebJetAdmin.
How to customize the configuration file?
Understanding the Configuration file
The XML file begins with a section which gives you an identifying code (GUID) for each Printer function, called “Permission” and each Sign-in Method available on the printer.
The section starts with the < OxpdConfigurationReferenceObjects > element and contains 2 sub-elements:
- < PermissionList > which provides the GUID for each permission.
- < SignInMethodList > which provides the GUID for each Sign-in method.
You will need the GUIDs to customize the configuration file.
As an example, this is the GUID for the “Print from USB Drive” permission:

Customizing the Configuration file
The actual rights given are in the section which begins with the < OxpdAuthzProxy > element and are divided into three sets:
- < guestPermissionId > All printer functions (Copy, Fax, Scan, etc.) that you need to be accessible without authentication (Guest Access) need to be identified in this section.
Put each Permission GUID under the guestPermissionSet element and inside the guestPermissionId tag.
In this case:

Users can Print from USB Drive without Authentication.
- < PermissionToSignInMethod > In this section, you will define which specific Authentication Agent will be used for Authentication on each printer function.
Under the < PermissionToSignInMethod > section, put the Permission (function) GUID inside the permissionId tag and the corresponding sign-in method GUID inside the signInMethodId tag.
In this case:

The “Copy” function requires the user to be authentified by Celiveo.


- < defaultSignInMethod > Put the desired sign-in method GUID inside the defaultSignInMethod tag.
Put the desired sign-in method GUID inside the defaultSignInMethod tag.
Here, the default sign-in method is the Celiveo Authentication Agent.


- < allowAlternateSignInMethods > This element value should be set to “False” in order to restrict the access to the activities with another Authentication Agent. By default, it is set to “True”.
- < addNewPermissionToGuest > This element , when set to “True” will grant the Guest Access to newly installed applications (when Celiveo is already installed). Otherwise, the New Applications (Permissions) will be locked by the Default Sign In Method. By default, it is et to “False”.
Sign-in Methods GUIDs
| Description | GUID (Permission ID) |
|---|---|
| Celiveo Authentication for Celiveo Badge, PIN and Username and Password profiles | 60c23e33-38f5-4584-884a-c7d4999e63c9 |
| Celiveo Authentication for Celiveo Smart Card profiles and Celiveo Smart card profiles with Login and Password as secondary profile | 60c23e33-38f5-4584-884a-c7d4999e63d0 |
| Celiveo Dual Factor Authentication for Celiveo Badge with Dual Factor Enabled profiles | 60c23e33-38f5-4584-884a-c7d4999e63d1 |
| Celiveo Enrolment with the Celiveo “Enroll Me” Permission | d4840600-9f9b-434f-b4b1-56e6c78b971f |
| HP Pin Authentication Agent | 41accec0-a865-4dc5-9e1f-25ab790ebec0 |
| HP LDAP Agent | 8a3a1a8c-773f-8b17-1dc6-1780745631a2 |
| HP Windows Agent | 5470b2ae-29cf-415b-a22d-349b50c9cb13 |
Control Panel Features GUIDs
| Description | GUID (Permission ID) | |
| Settings | 3dfe6950-5cf9-41c2-a3b2-6154868ab45d | |
| Copy/Print | 3c06acc4-f0e9-4248-8933-4aa500cee7b8 | |
| Manage Stored Jobs | fbd10c44-f550-498a-bfa0-b7e634afa551 | |
| Manage Trays | d41cc382-c023-46dc-b722-4178a599901a | |
| Enable Print from USB Drive | 7b8e9297-1c88-4316-b1c8-ed7a5b8eb4c7 | |
| Default Print Options | 07799ea1-52ea-4cc8-8dbf-1458dc2f39d1 | |
| Print Quality | dceabb35-81d0-4c5f-a2f8-4c9c318b043b | |
| PCL and PostScript Settings | 7389ff49-20e5-41ff-9b96-5c1df60d7e67 | |
| Scan/Digital Send | 2565f335-e4ad-4cde-966d-30d9f3f1999f | |
| Email Settings | a639160a-7b18-4c02-b4a4-00b9026f00d6 | |
| Email Setup | 52099d81-6fd5-481f-84ef-588c8ce39a3c | |
| Scan to USB Drive Settings | 4d1dc259-0d38-4bfd-b121-b11c22bc67bc | |
| Network Folder Settings | 74d83bcd-0cd0-4f89-aca5-39df93cb0b0d | |
| Digital Sending Software (DSS) Setup | c980a35a-3e93-4971-b8c6-f76cbfbeedcf | |
| Fax | 965dabb4-8d1a-42df-943a-74c368a4c144 | |
| Fax Send Settings | eca4c819-4f03-458c-9aff-62f4be730e0b | |
| General | a062b6d9-8475-4663-8bbf-c9ed15e8d460 | |
| Date/Time | defd075a-d6a7-498e-9efb-4b9465a8c091 | |
| Display Settings | cdd8157e-c605-473d-939b-98994607a436 | |
| Energy Settings | fdc59fb8-3a54-426d-9f5a-2d9087233bb0 | |
| Restore Factory Settings | b532012c-4017-472a-97d7-625f628bf75b | |
| Enable Device USB | 74425807-8557-49ae-820c-ce203f15e96b | |
| Manage Supplies | 1a2d31a0-b6c8-4497-a708-707792bd2609 | |
| Networking | 4fdcd8b2-6e7e-44da-924a-85981a727c1b | |
| Network Protocols | 4692a241-8998-4aa8-9d31-1f8ccb43ea14 | |
| Reports | 34876b06-05be-4044-b61c-40cca9dfe4cb | |
| Configuration/Status Pages | 7bb1b399-d731-4f3e-a013-82ce9ea9434f | |
| Supplies Status Page | 978af7de-4501-4709-b4e6-ecc056d41917 | |
| Usage Page | 7e162dc5-a9af-4af2-b3a3-48c2d6e6bb7b | |
| Configuration Page | c4fc5dcf-d03f-46e0-8e42-085ec5c3c108 | |
| File Directory | a12676bb-aa09-44bf-9608-a8d14cde50d7 | |
| Fax Reports | f22bab25-0bde-4983-9e28-24e536f13981 | |
| Blocked Fax List | 5d1f0b3f-131e-4901-9807-a17d21ed11ba | |
| Fax Activity Log | 8591cb93-584c-43db-af22-eb9a817add9c | |
| Billing Codes Report | 84fc50f6-338d-4f5c-baba-e3a90418f364 | |
| Last Fax Call Report | d13fe446-6403-40c4-8f95-c734978d3dd3 | |
| Other Pages | 81fbf819-ac36-481d-8736-c66a20a3ce75 | |
| App Gallery | 4443c06a-0b8a-4442-aad7-ac773c9B9cee | |
| Contacts | 900a0d59-533a-497e-8e89-2b5bc898d5cc | |
| Ability to edit a Speed Dial | ed979c88-86e4-422a-9842-6da6d53b431b | |
| Ability to manage contacts in a Personal address book | 1047e094-c564-4bcc-8a14-370bfddfb796 | |
| Ability to manage contacts in shared address books | 6d777dcb-f62b-4cec-b536-c39078e14fc5 | |
| Copy | cedab422-33b3-4638-b6a1-604e54525215 | |
| Save defaults for Copy and Scan to Job Storage | 57325ed2-49cd-4253-86f4-dc9af7103bda | |
| Load Copy Quick Set | 1fc3f42a-f887-461c-a27a-66a73156308a | |
| Save new Quick Set for Copy | 6b27ea0c-5311-4ce7-b0a8-aa4d21afe76b | |
| 1-sided copy output | 7deecd46-5c05-4ce7-9c23-0c6fa1d5fc01 | |
| Support Tools | 1d370ecf-fb74-44ae-8934-39740a6911ed | |
| Troubleshooting menu | a9e3da1b-8173-419f-bd6a-2cc325567c4c | |
| Retrieve Diagnostic Data | e4835c1f-7f0e-446b-9fc2-f18ef145698f | |
| Fax | 44aa632b-cfa3-4c10-8cab-697a9bef610b | |
| Save defaults for Fax | 016d46c6-5a3a-4646-910d-0ede122b949e | |
| Load Fax Quick Set | 8b99a8ad-9432-48a1-baca-22b0df6c65e4 | |
| Save new Quick Set for Fax | c33fdc04-682f-43ab-9f70-fdedfdc1d74b | |
| Ability to edit the billing code | 922cd28d-77a8-47a8-85c4-f117f5f69c82 | |
| Scan to SharePoint® | a3d696df-b7ff-4d3d-9969-5cd7f18c0c92 | |
| Ability to edit the SharePoint® path | 19363c7c-235e-4c78-8be3-fb4673d59b25 | |
| HP Command Center | A935C131-CBE6-4d09-9AC2-624C12A9033B | |
| Job Log and Active Jobs | 56ce9217-377d-4d5c-a950-a2ad37c07882 | |
| Details or Cancel any user’s job | 3c40cf32-1d3d-4051-9ba2-0a7b839b0288 | |
| Ability to Promote any user’s job | 4068badd-7fa0-4c8f-b875-bf7e04dec26e | |
| Ability to view other specific users’ jobs in the Job Log | ef4dbcd9-34d5-46e2-af53-1bacda9e2a34 | |
| Print from Job Storage | 87550e5e-f927-11df-950b-00306e48bff7 | |
| Stored Faxes | d544b0ba-a3fb-4911-a82b-bf4f891b3308 | |
| Delete protected jobs without entering the password or PIN | a4dfaedc-7724-48ea-948a-5cd7b11407f0 | |
| Ability to view other specific users’ jobs and folders | 535ea693-db6d-4beb-b548-f1693460eab3 | |
| Scan to Job Storage | d6c8dbb4-0cea-4147-b8a7-0cffd9c3ca90 | |
| Print from USB Drive | 12642a24-5e74-41a2-a154-20d20436abee | |
| Remote Scan Request | 573619b2-7527-48b7-9ef7-ea0dcca519b5 | |
| My Print Jobs (Celiveo) | b629740c-1667-11da-a344-0010837a5f07 | |
| Enroll Me (Celiveo) | b629740c-1667-11da-a344-0010837a5f08 | |
| b8460c9e-43c8-4290-a0f8-8ce450867f09 | ||
| Ability to edit the BCC field for email | 1502c3b6-db02-4010-ab27-a9a11f353ff0 | |
| Ability to edit the CC field for email | eb70fc52-81a7-4261-9978-f31c09ed87dc | |
| Ability to edit the From field for email | 5a707440-966b-4598-9c9b-29b08838d9a7 | |
| Ability to edit the body of an email | 1d073e3c-7bd1-4269-b029-4e26c17c65b8 | |
| Ability to edit the Subject field for email | e56b78b2-5081-4473-9761-f90c79cca974 | |
| Ability to edit the To field for email | b35a7519-0680-46cd-834c-3096ab8a8692 | |
| Save defaults for Scan to Email | d5e988c7-c39c-4e77-b53f-51c6fdea210a | |
| Load Email Quick Set | d8a96619-9aba-4249-afac-b2db90d0ca8b | |
| Save new Quick Set for Email | 5af2a754-d27c-40a4-a56d-2e7191def383 | |
| Scan to Network Folder | 65acca51-619d-4e29-b1d0-6414e52f908b | |
| Save defaults for Scan to Network Folder | f69557b5-82f6-4269-894c-1b4046a0a92a | |
| Ability to edit the network folder path | ee19ffb2-d93c-42ab-a23b-b868a63304a3 | |
| Load Scan to Network Folder Quick Set | 3ecf76a7-4ebe-4265-8cdf-22f4f359daf9 | |
| Save new Quick Set for Scan to Network Folder | f753d9a7-c4fc-47c8-abd3-49d901528f29 | |
| Scan to USB Drive | 09866970-7133-404f-bb20-440b9148e8e2 | |
| Save defaults for Scan to USB Drive | 00aed7aa-fc3b-4d18-81dd-e46365576f6a | |
| Load Scan to USB Drive Quick Set | 1bd63e89-82c9-4360-82c6-1fe9b4241247 | |
| Save new Quick Set for Scan to USB Drive | 4044fe20-84a3-4314-a708-35626144609b | |
| Supplies | a5e59604-d216-4977-a901-4774fcacbcb4 | |
| Trays | ||
| Ability to modify tray size and type settings | e402dfff-566a-45c9-a0d3-18350436666e | |
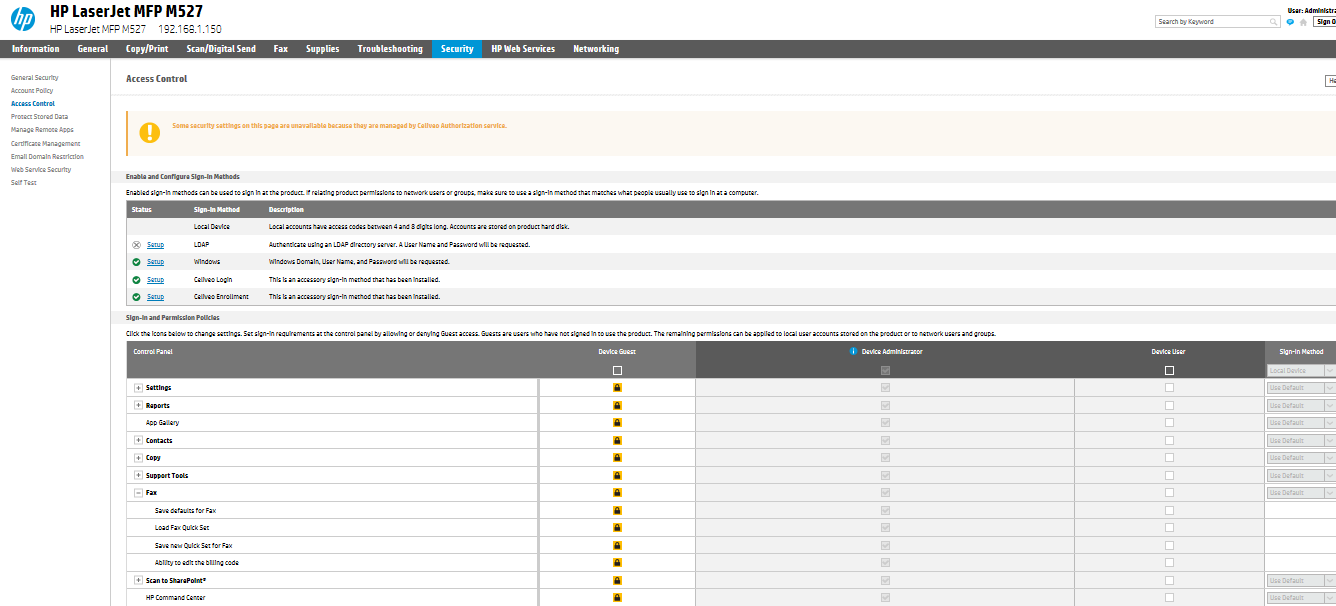
On the Printer Panel
Once the configuration file has been customized and uploaded to the Web Admin and once the printer has been synchronized, the Custom Access Control configuration is applied and the Security Settings are locked on the printer panel. If the Celiveo Authentication Agent is removed, the settings become available again.
Post your comment on this topic.