
What is a macOS Celiveo Virtual Printer (CVP)? ![]()
![]()


The macOS CVP is a module that is deployed on a user’s macOS enabled device, macOS supported versions., so that they can perform serverless pull print and release print jobs on Celiveo enabled-printers. On the Web Admin, you add a macOS Celiveo Virtual Printer (MCVP) and generate a deployment package. Later on, you use the deployment package to install the CVP macOS enabled device.
1. Start the Add Virtual Printer Wizard
- At the Main menu, click on Printers
![]() .
. - At the Printer menu, click Add Virtual Printer
![]() to start the Virtual Printer Wizard.
to start the Virtual Printer Wizard. - Chose macOS Icon and define a macOS Celiveo Windows Virtual Printer name that will be shown in the deployed print queues for end-users.
![]()
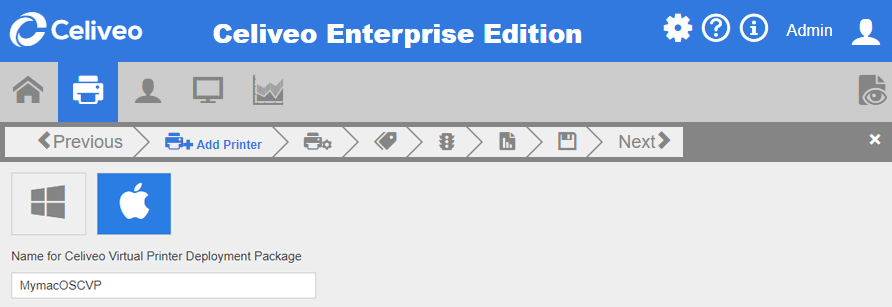
2. Specify Virtual Printer Options
- Specify a name for the macOS CVP deployment package. After you add the macOS Celiveo Windows Virtual Printer, you can download the deployment package and install it on macOS enabled device.
- Click [Next]. The next page displays.
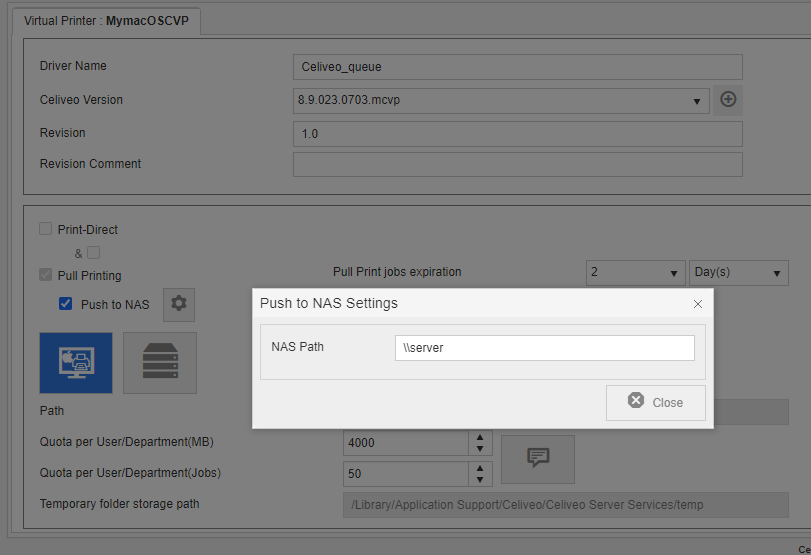
- At [Revision], enter a version number for the deployment package.
- At [Revision Comment], enter any information that may be useful for the users. This field is also used to enable dynamic IP Address change:
- You can choose either the Local (HDD of user macOS device) or Remote server to store the print jobs.
2.1 To store print jobs on local drive:
- Click
![]() icon to store print jobs on local (user workstation) hard disk.
icon to store print jobs on local (user workstation) hard disk. - Path – Enter the directory location in which the user jobs are to be stored, if you need to change the default storage location set.
- Quota per User/ Department (MB) – indicates the quota for a user or department on the basis of print job size.
- Quota per User/ Department (Jobs) – indicates the quota for a user or department on the basis of print job count.
- The Notifications
![]() icon allows you to define the message to display when quotas are reached. To do so, click the Configure
icon allows you to define the message to display when quotas are reached. To do so, click the Configure ![]() button.
button. - Temporary folder storage path – Enter the directory location where the jobs are to be stored on a temporary basis.
2.2 To store print jobs on a network drive:
- Click
![]() icon to store on remote server.
icon to store on remote server. - At [Domain], enter the domain name of the network drive to store the print jobs.
- At [User name] and [Password], enter the login credentials to the network drive to store the print jobs.
- At [Retry Count], enter the number of attempts to reach the network drive to store the jobs.
- At [Retry timer], enter the time interval (seconds) between each attempt to reach the network drive.
- Path -Enter the directory location in which the user jobs are to be stored. Ensure that the user has read/write access permissions on the shared network folder.
| CVP (Client station mode) Configuration |
|---|
 |
|
NOTE: When the NAS is not reachable upon Shutdown of the macOS device, the print jobs are retained on client macOS device default jobs location.
Last modified:
3 March 2025
Post your comment on this topic.