
System Requirements
The system requirements for installing Celiveo 8 solution can be found here.
Ports and Communication
A comprehensive list of all the ports used by Celiveo solutions, describing the ports and applications used for communication between the Celiveo components that consist of the Celiveo Server Services, Web Admin Server, Active Directory, Database (SQL) server, the device, and the PC/laptop/workstation can be found here.
Prerequisites
Before you install, make sure these prerequisites are met:
- The device is connected to an active LAN connection.
- The device has a fixed IP or DHCP reserved IP address.
- The network allows management by Simple Network Management Protocol (SNMP) v1/v2.
- Enable HTTPS for Xerox secure access.
- For some Xerox devices, enable “Custom services” if it is not an in-built option.
- From the device embedded web services, set the device session time to be longer than the default Celiveo Web Admin inactivity time out (30 sec).
- Xerox devices require (EIP) Extensible Interface Platform 1.5 or higher and (JBA) Job-Based Accounting to run the Celiveo solution.
- The Celiveo Smart Appliance is connected to the device.
Configuring CSA
By default, the CSA is set in DHCP mode. You can also opt for fixed IP network settings.
The steps to configure CSA for DHCP and for fixed IP network settings can be found here.
Celiveo Version upgrade on CSA
Follow the procedure given here to upgrade the Celiveo Version on CSA.
Configure Xerox WorkCentre devices in CentreWare Internet Services
Follow these instructions to configure the Xerox WorkCentre device through CentreWare Internet Services:
- At the web browser, enter the IP address of the device.
- Click Login, then enter a valid username and password.
The Celiveo solution automatically configures the settings for the device.
Current device configuration settings are listed on the Configuration Page, and can be printed as a Configuration Report via that web page or the device local user interface.
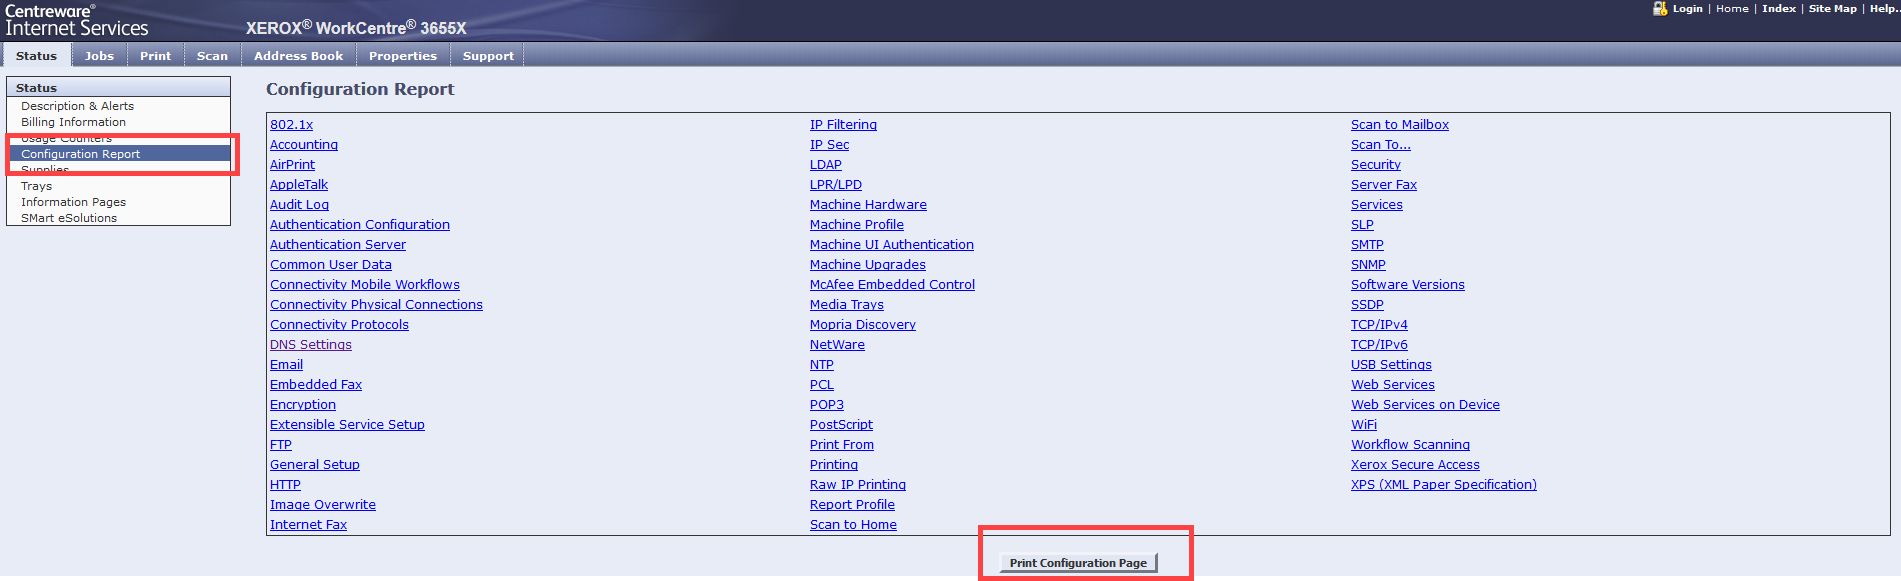
To manually setup the connectivity settings:
- Go to Properties > Connectivity >Setup
- Under Network section, verify that Wired connection profile is selected.
- Click the Edit icon to configure the IP settings for the device.
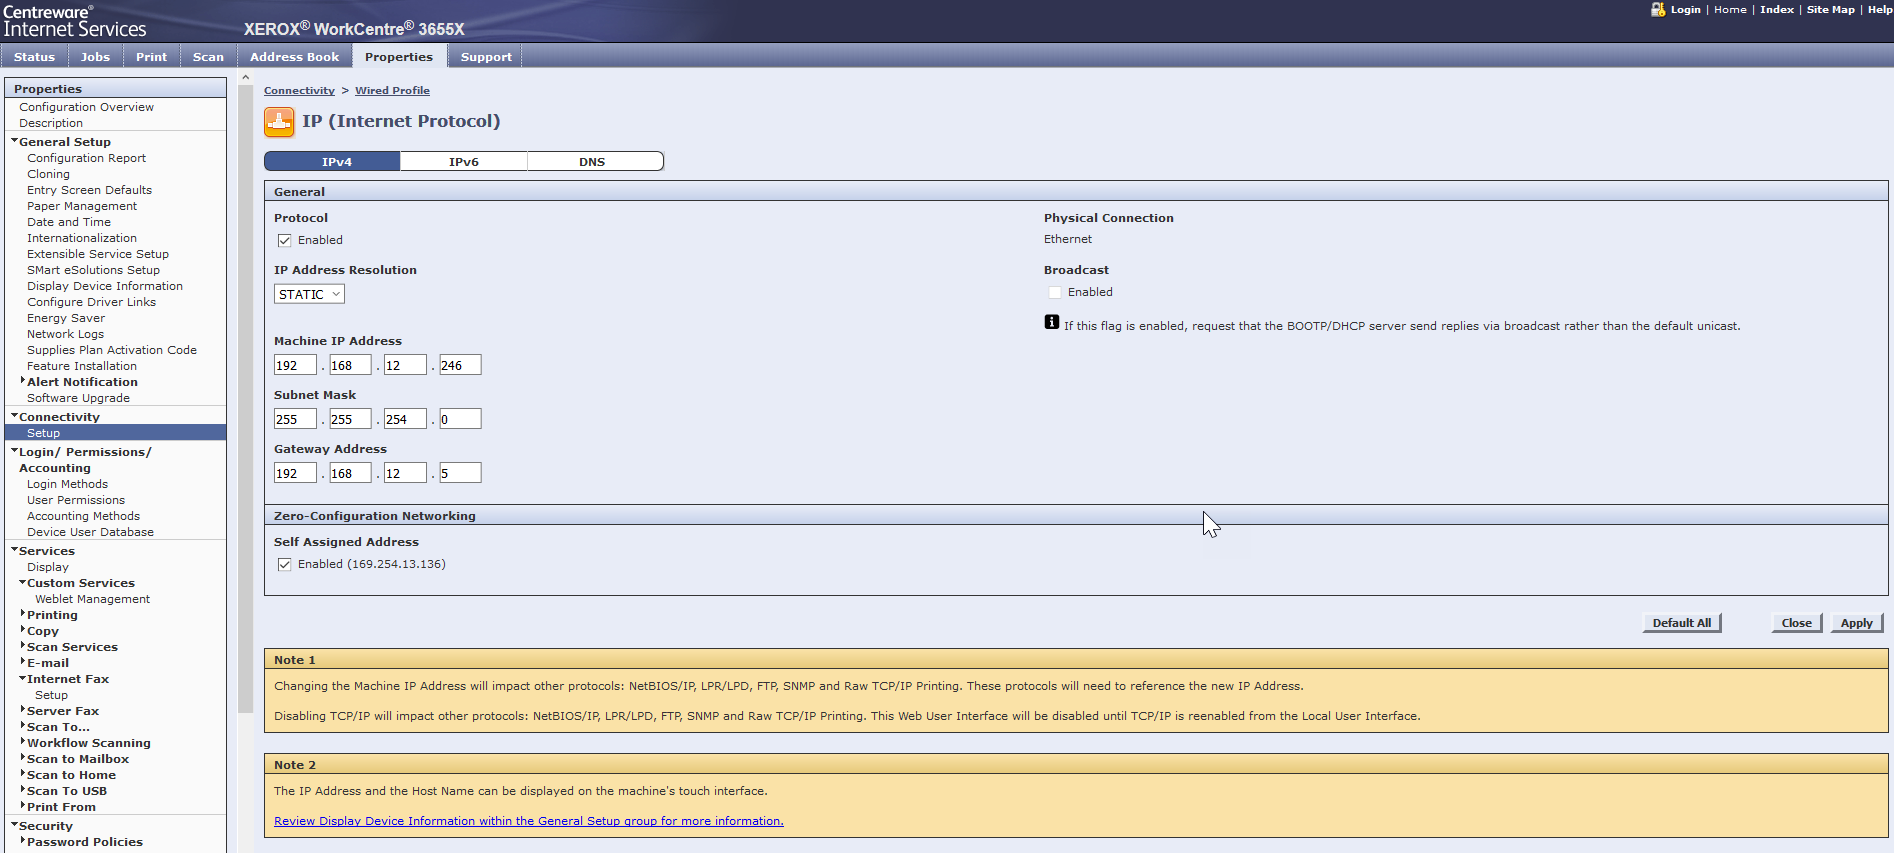
- Under the IPv4 tab, in General section, select the Enabled checkbox for Protocol.
- Choose the IP Address Resolution from the drop down list.
- Enter the IP address for the device and other details, in case Static IP Resolution is selected. Refer to the image shown below.
![]()
- Click Apply.
- Similarly, you can configure the settings for IPv6. IPv6 is optional. This may be used in addition to, or in place of IPv4.
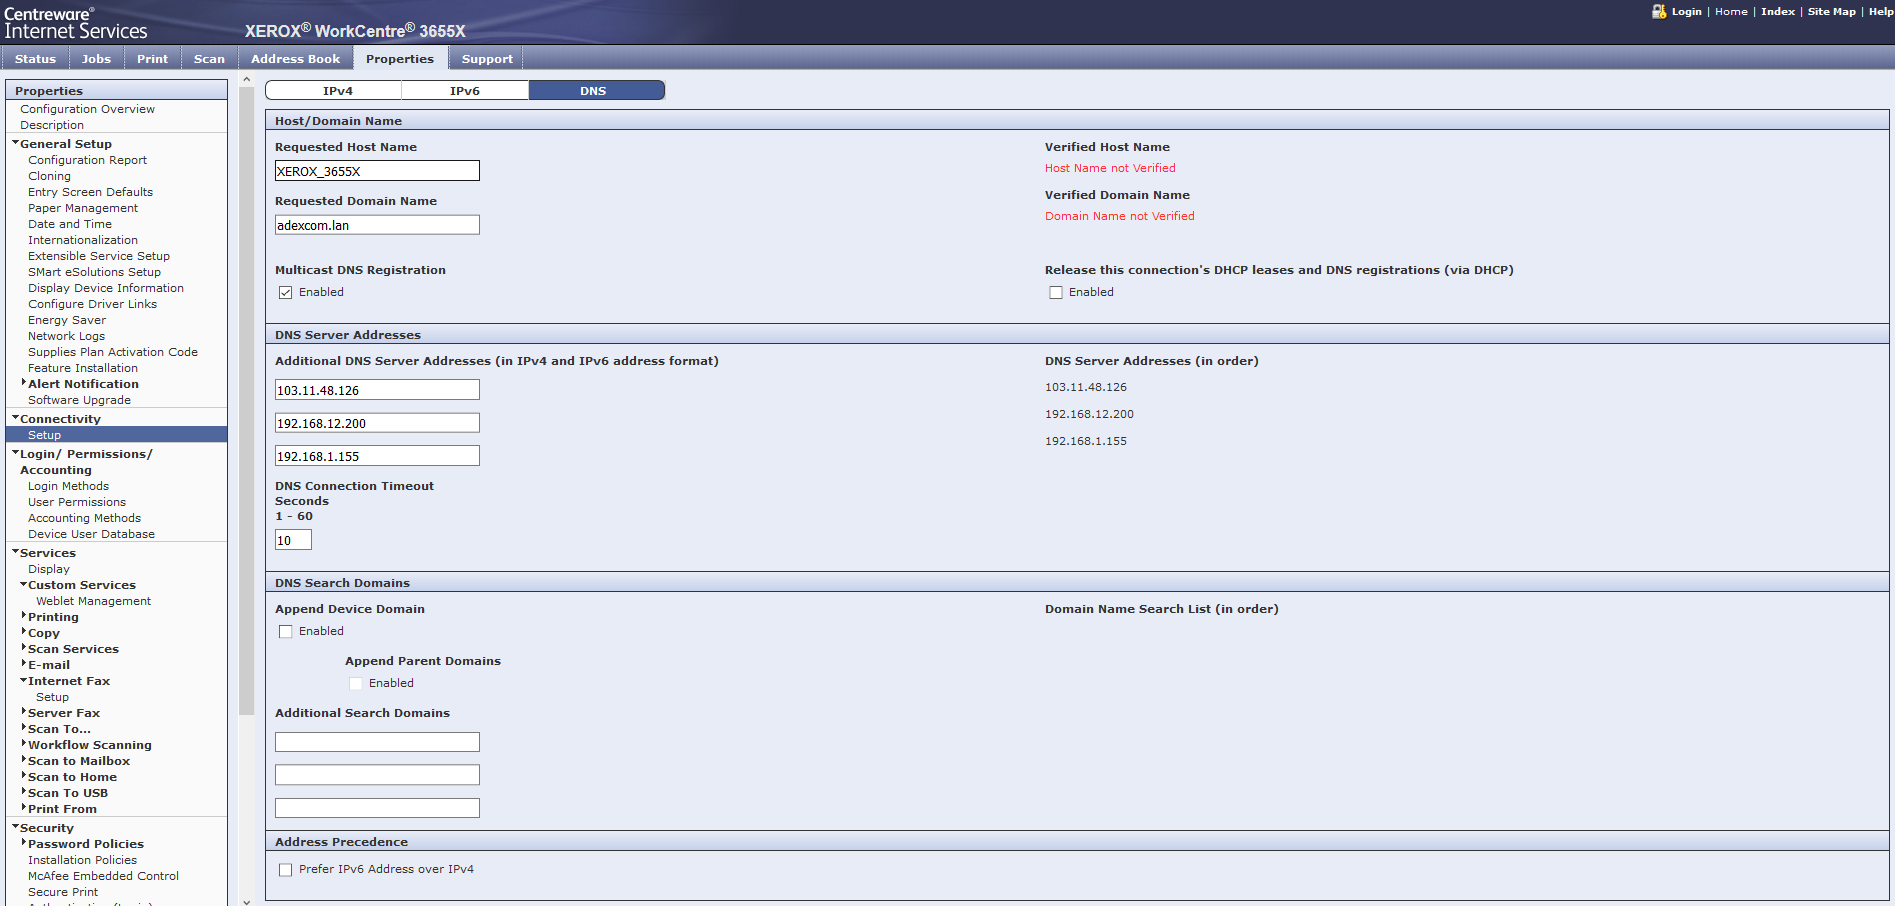
- Select the DNS tab. Provide the Host name, Domain name, and DNS server addresses.
- Click Apply.
![]()
Memory Clear and Diagnostic Entry
This is an optional procedure. You may follow this process to clear the printer memory and restore the factory settings:
As precaution, do the following before performing memory clear for the device:
- Print the following reports:
- Fax phone book
- Local and group members e-mail address books.
- System configuration.
- To save the printer settings, export the fax address book, local and group email address books and then perform a cloning procedure through Xerox Web interface.
To perform Memory Clear on the device:
- Select Copier Diagnostics > Memory Clear.
Selecting Memory Clear will result in the following:- Mailboxes to be deleted.
- Templates to be deleted from the hard disk.
- NVM values to be reset to default.
- Fax (if available) to be re-installed.
- Import the fax address book, local and group email address books, and then install the clone file through Xerox Web interface.
Diagnostic Entry
To enter Diagnostics mode in Workcenter model printers:
- Switch on the device.
- When the device is in the Ready state, on the device panel, press and hold # key and then press the Log In/Out key. The Diagnostics Entry screen opens.
- Enter the password.
- Select Start on the device panel.
The Diagnostics Screen will be displayed.
To exit from Diagnostics:
- Select the Close tab on the UI to exit from the dC procedures.
- Select the Call Closeout button to exit diagnostics.
- When the Call Closeout window is displayed, the following options are available:
- Reset All Counters. The default is No. If the Yes button is touched, the following counters are reset:
- Error Messages.
- Last 40 Error Messages.
- Total Images made after the last service call.
- Exit Only (in 4265)
- Exit and Reboot (in 4265)
- Cancel (in 4265)
- Reboot device. The default is Yes. Image processor, IOT, scanner, UI, DADF and Finisher are rebooted. Touch the No button if the device reboot is not needed.
- Reset All Counters. The default is No. If the Yes button is touched, the following counters are reset:
Configure Xerox VersaLink Series devices via the Internet Services interface
- Open a Web browser and enter http:// in the Address field
- Log in with your Administrator credentials
Connectivity Settings
- On the left panel, select Connectivity > Ethernet.
- In the DNS section, select Edit to configure DNS settings.
![]()
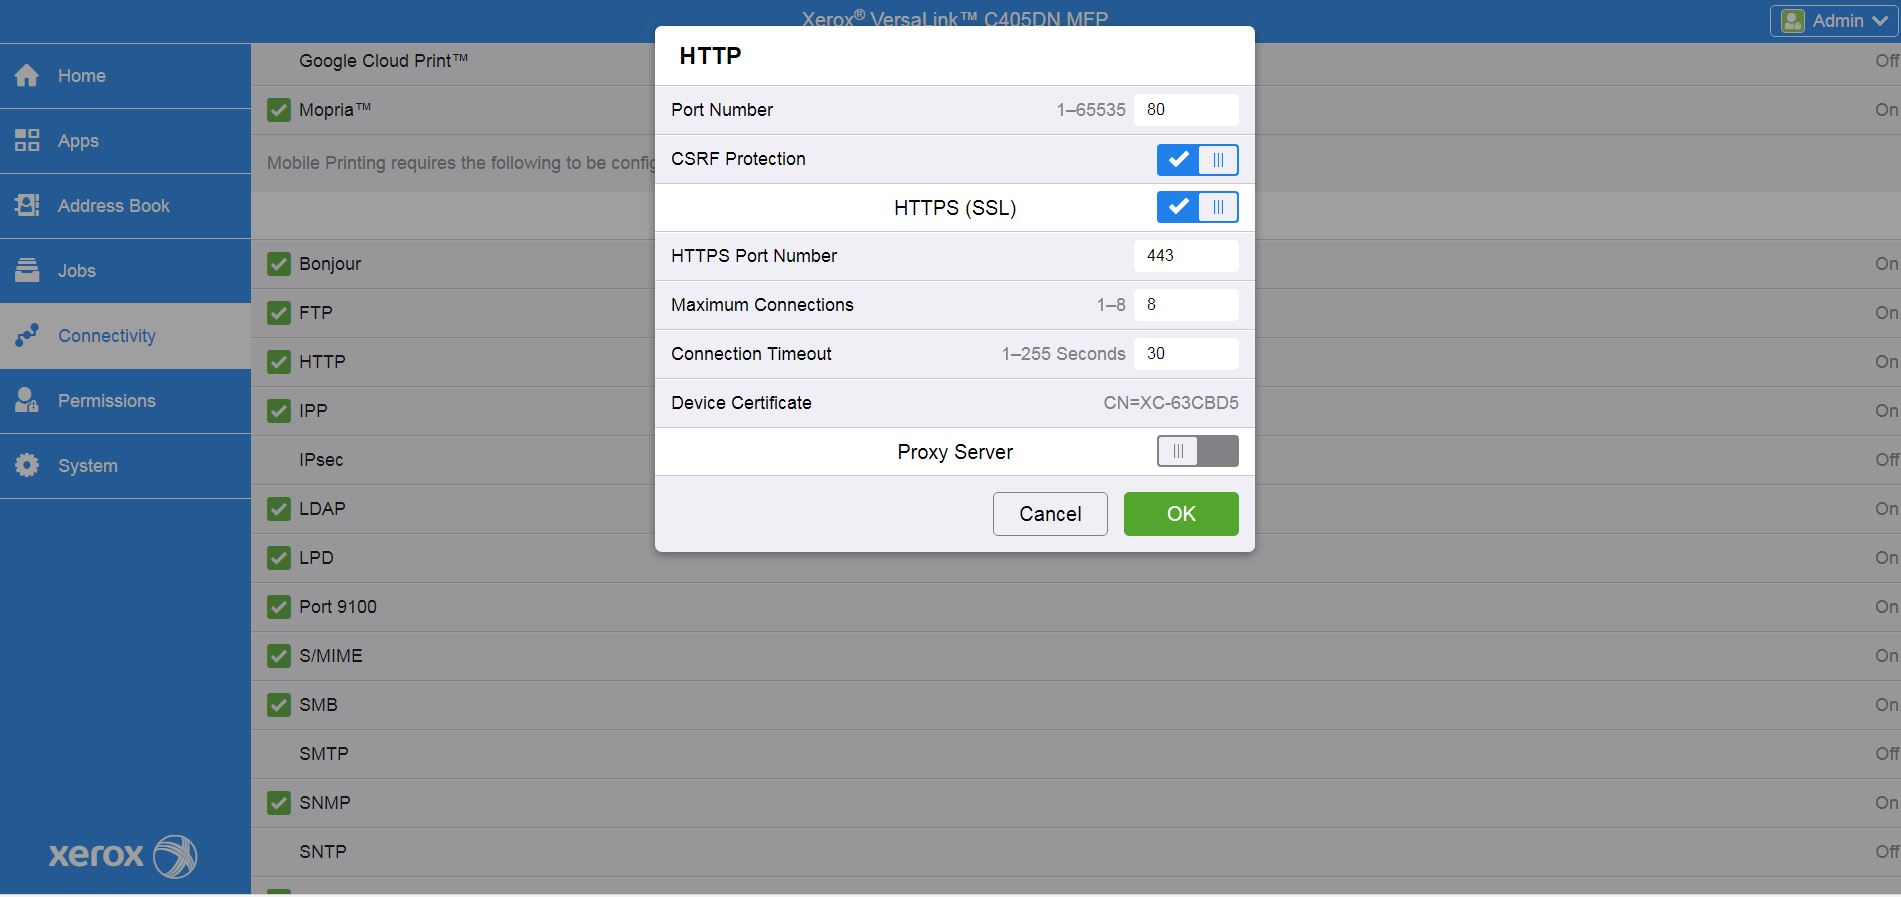
- Once DNS settings are properly configured, click OK and go back to Connectivity and in the Protocols section, select HTTP.
- Make sure the HTTPS (SSL) option is enabled and that the corresponding fields are filled.
![]()

Permissions settings
Check that all permission parameters are correctly set:
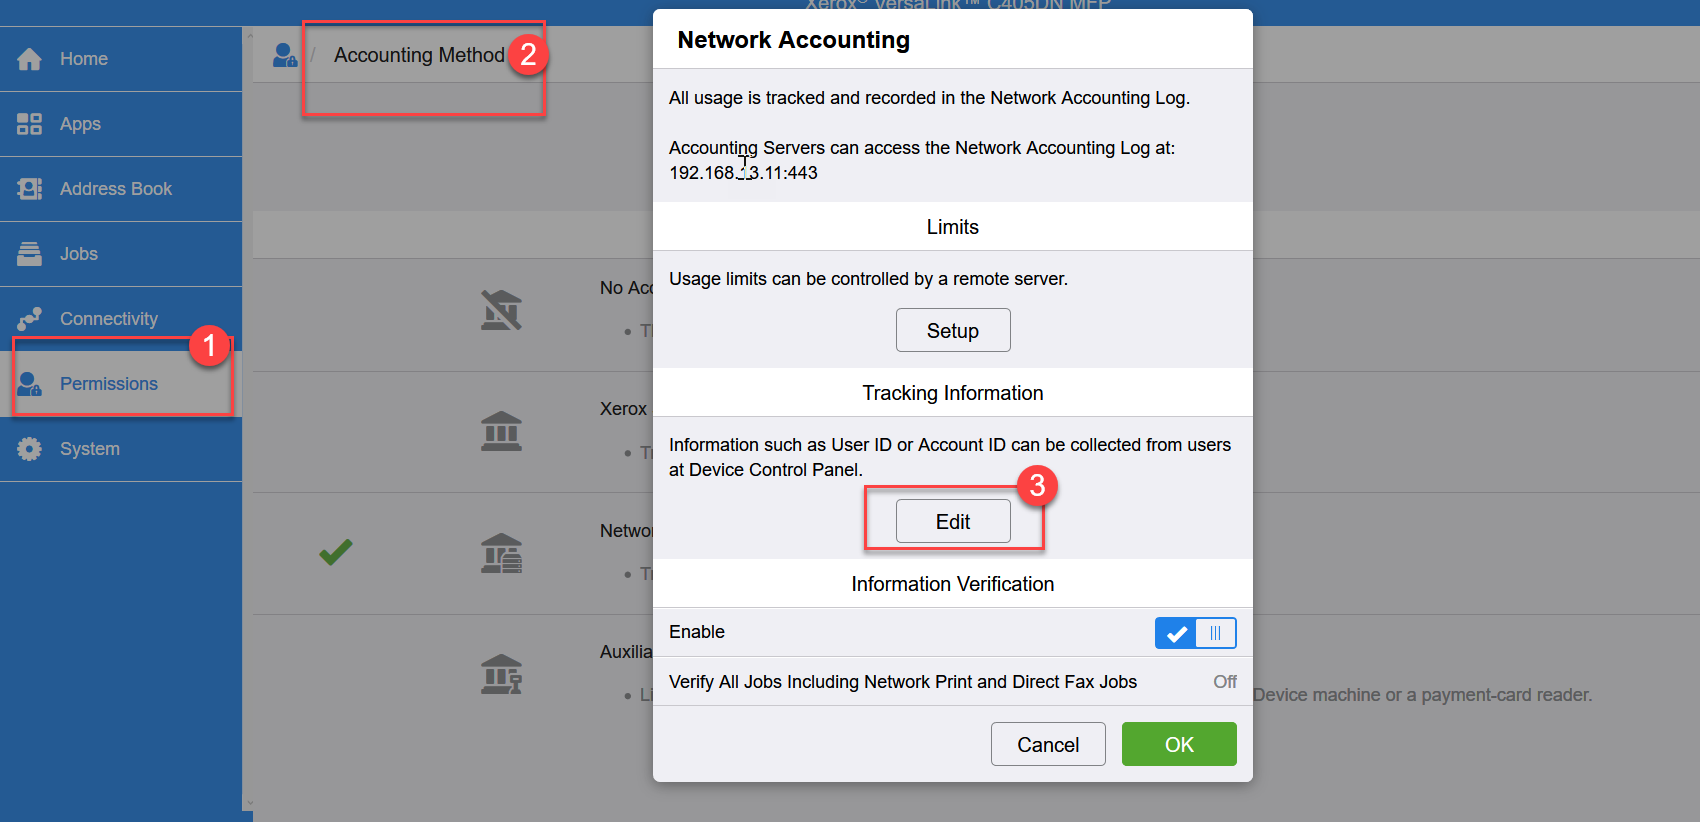
- Go to Permissions > Accounting Method and click the Edit button in the Tracking Information section.
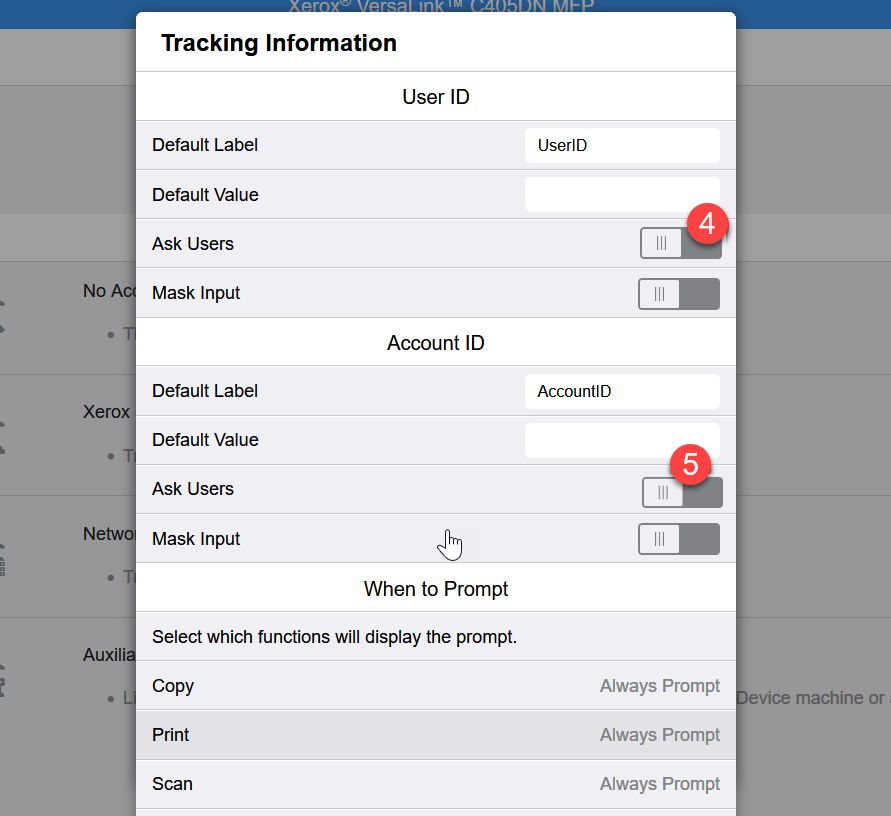
Make sure that the Ask Users options under User ID (4) and Account ID (5) are DISABLED.
![]()
- In Permissions, click the Edit button next to Guest Access to configure the access permissions to non-authenticated users.
![]()
- Then go to the Login/Logout Settings menu and click the Edit button below Advanced Settings. Make sure the Obtain User Information on Login option is enabled.
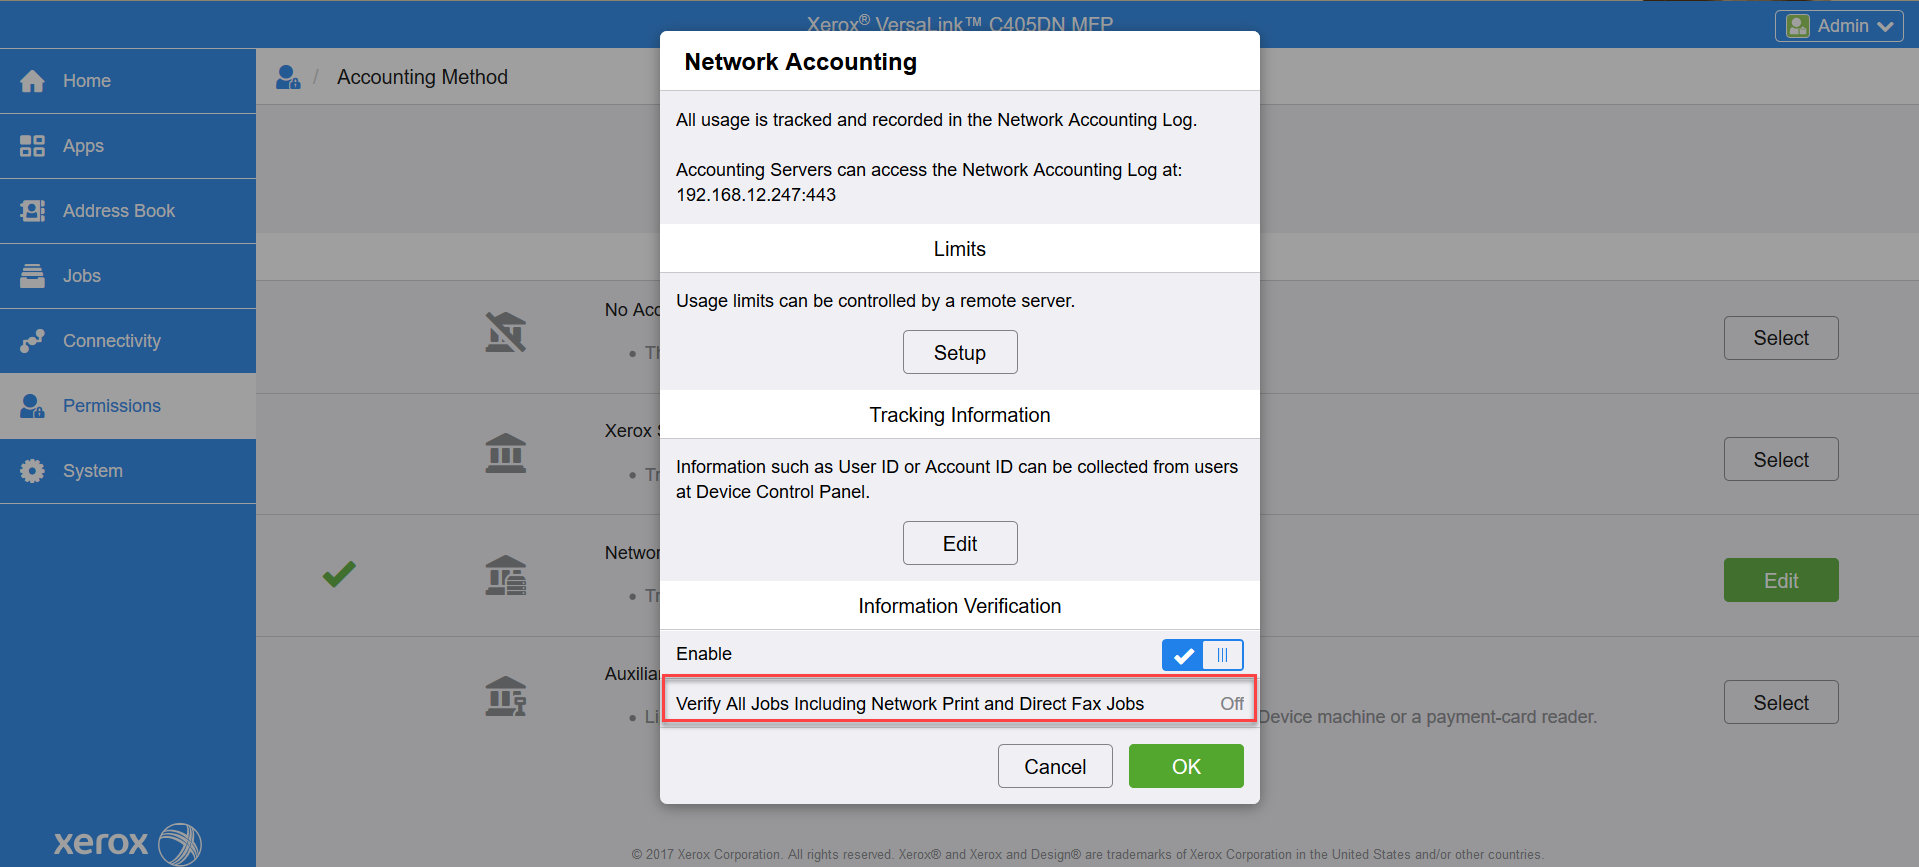
- In Permissions > Accounting Method, click the Edit button next to Network.
![]()
- Under Information Verification, make sure the Verify All Jobs Including Network Print and Direct Fax Jobs option is disabled.

System Settings
In the left menu, select System > Security > SSL/TLS Settings then configure the options as shown below:

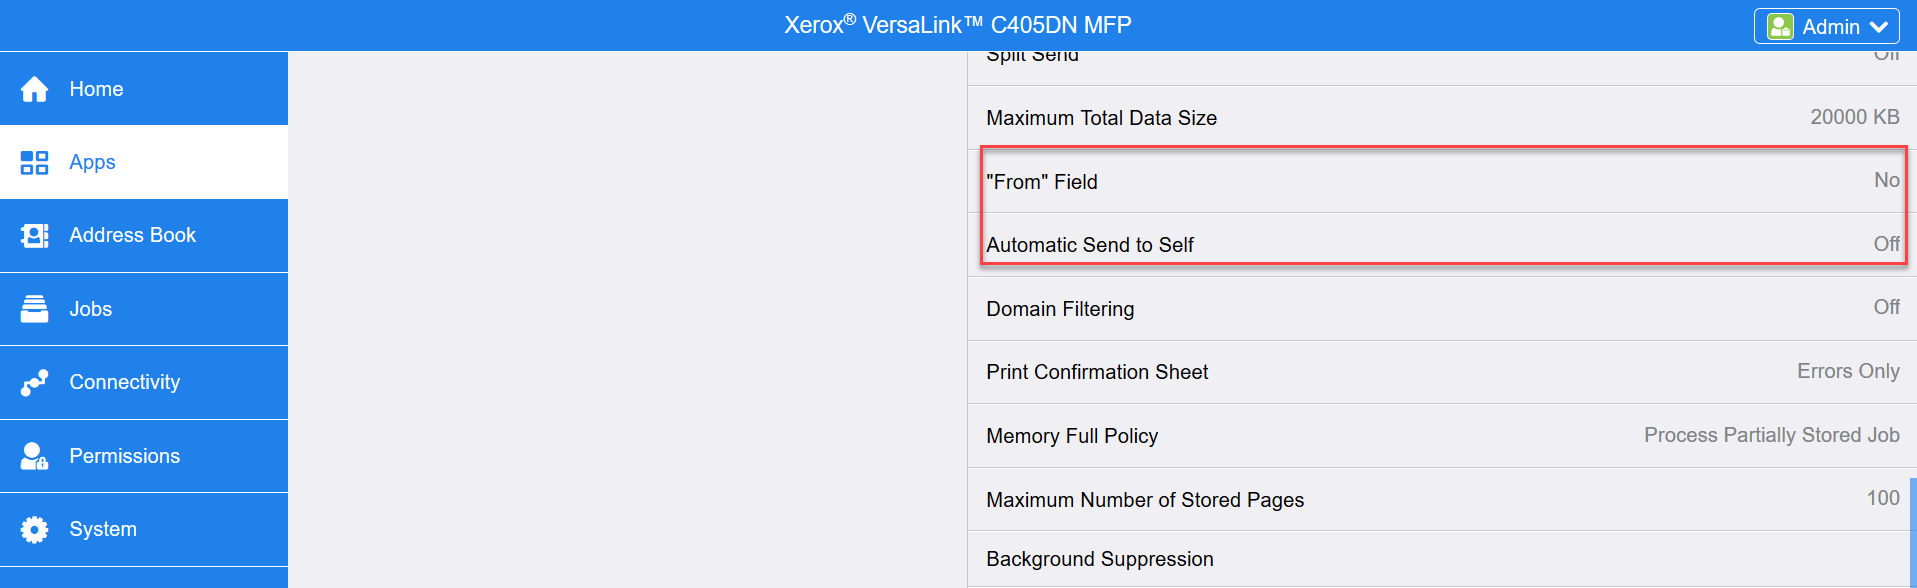
Scan to Email Settings
In the left menu, select Apps > Email and make sure the “From” Field and Automatic Scan to Self options are disabled.
Resetting the Printer Settings
- At the printer control panel, log in as administrator, then press the Home button.
- Touch Device > Resets.
- To reset the settings for 802.1X and IPsec, touch Reset 802.1X and IPsec.
- At the confirmation message, touch Reset.
- To delete all the downloaded fonts, forms, and macros from the printer memory storage, touch Reset Fonts, Forms, and Macros.
- At the confirmation message, touch Reset.
- To reset the printer to factory defaults, touch Reset to Factory Defaults.
- At the confirmation message, touch Reset.
Source: Xerox® VersaLink® Series Multifunction and Single Function Printers System Administrator Guide available at http://download.support.xerox.com/pub/docs/6510/userdocs/any-os/en_GB/VersaLink_series_sag_en-us.pdf
Configure Xerox AltaLink Series devices via the Internet Services interface
Xerox Altalink devices do not need any additional configuration. The Default settings should be left as is.
Upgrade OSI from 8.9.022.0302 to 8.9.022.0602
On Xerox VersaLink C405
1. Synchronize the printer with OSI 8.9.022.0302.
2. Authenticate to display the Celiveo icon on the Home page
3. Synchronize the printer with the OSI upgrade from 8.9.022.0302 to 8.9.022.0602
4. Check the Apps on EWS. Only Celiveo should be visible without the My print jobs and Unenroll me buttons.
5. Synchronize the printer again.
6. Wait around 30 seconds. The printer reboots.
7. Authenticate on the printer. The My print jobs and Enroll me icons appear on the Home page.
On Xerox WorkCentre 3655X
1. Synchronize the printer with OSI 8.9.022.0302.
2. Authenticate to display the Celiveo icon on the Home page
3. Synchronize the printer with the OSI upgrade from 8.9.022.0302 to 8.9.022.0602
4. Authenticate on the printer. The Celiveo icon displays on the Home page
5. Delete the printer from the Web Admin.
6. Add the printer again on the Web Admin and synchronize it.
7. Authenticate on the printer. The My print jobs and Enroll me icons appear on the Home page.
Limitations
Some Xerox printer screens do not feature Asian languages fonts and print job names may not appear correctly if they contain such characters.
Post your comment on this topic.