
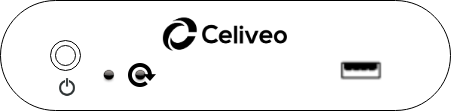
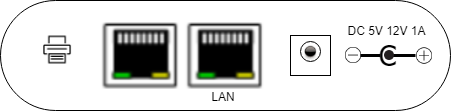
Connectors
| Connector | Description | |
|---|---|---|
| Power switch |  |
Power ON/OFF. Needs to be pressed continuously until the CSA switches On or Off. |
| USB port |  |
(Optional) Connect a Celiveo authentication hardware such as a card reader to the USB port. |
| Reset Button (Pinhole) |  |
Re-initialize the CSA |
| Printer port |  |
Connect the supplied network cable from the CSA to the printer. |
 |
||
| Network port |  |
Connect a network cable from the CSA to the local network. |
| Power supply |  |
Connect the supplied USB power cable from the CSA to the USB port on the printer. |
 |
Specifications
| MEASUREMENTS | ||
| Size | 25 mm x 77 mm x 118 mm / 0.98” × 3.03” × 3.98” | |
| Weight | 160g / 0.35lbs | |
| Case | Aluminum | |
| Color | Silver/Black | |
| Power Source | DC Jack | |
| Ethernet port | 2 x RJ45 | |
| Power | 5V / 9V / 12DC | |
| Certification | CE, FCC, IC, EAC | |
| Compliance | REACH, RoHS | |
Note: Electrostatic Discharges (ESD) will not damage the Celiveo Smart Appliance but may reboot in case of very high intensity.
Powering the CSA
Powered by the Printer USB Connector
- Short cable to power from Printer USB.
- 5v USB power is necessary.
- No need for external power supply.
- No extra wall plug required.
- CSA is OFF when printer is OFF.
- CSA needs up to 120s to boot.
Powered by an external power supply
- 5 to 12v 2A external power supply.
- C14 output, wall cable (supplied upon demand based on geography)
- CSA is not OFF when printer is OFF.
- Spare wall plug required.
Network Settings
By default, the CSA is set in DHCP mode. You can also opt for fixed IP network settings.
Configure DHCP IP network settings through USB
- Create a configuration file with the entry below. Save the file as ipsetup.conf file.
Remove any spaces in the configuration entries or the configuration file will not work.
DHCPIP Fixed IP
MASK=x.x.x.x Subnet Mask
- Format the USB flash drive to FAT32.
- Copy the ipsetup.conf file to the USB flash drive.
- Switch off the Celiveo Smart Appliance (CSA).
- Connect the USB flash drive with the ipsetup.conf file to the CSA.
- Switch on the CSA. The configuration file is automatically installed on the CSA.
- Once the configuration completes, the LED on the CSA changes to a steady green light.
- Remove the USB flash drive.
Configure Fixed IP network settings through USB
The fixed IP network settings are configured by providing the details in the ipsetup.conf configuration file.
- Create a configuration file with the entries below. Save the file as ipsetup.conf file.
Remove any spaces in the configuration entries or the configuration file will not work.
FIP=x.x.x.x Fixed IP
MASK=x.x.x.x Subnet mask
GATEWAY=x.x.x.x Gateway
PRI_DNS=x.x.x.x Primary DNS server IP
SEC_DNS=x.x.x.x Secondary DNS server IP
NTP_SERVER=x.x.x.x IP or hostname
SEARCH_DOMAIN=< value >
- Format the USB flash drive to FAT32.
- Copy the ipsetup.conf file to the USB flash drive.
- Switch off the Celiveo Smart Appliance (CSA).
- Connect the USB flash drive with the ipsetup.conf file to the CSA.
- Switch on the CSA. The configuration file is automatically installed on the CSA.
- Once the configuration completes, the LED on the CSA changes to a steady green light.
- Remove the USB flash drive.
Post your comment on this topic.