
Contents ![]()
- About High Availability
About High Availability
What is High Availability?
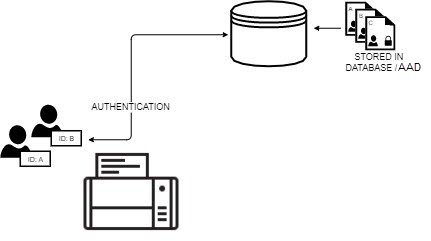
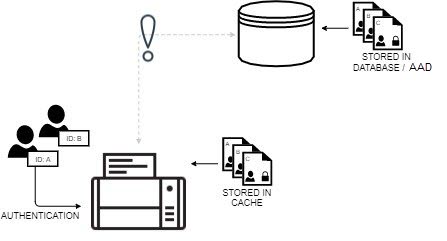
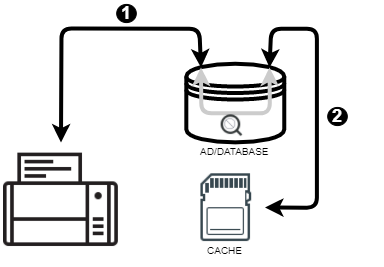
High Availability is an optional feature that makes badge authentication and PIN authentication possible, even when the connection with the back end is lost. This feature is implemented via a mechanism that authenticates user details against a cache at the printer, rather than the back end.
 |
 |
| Normal authentication | Authentication when link to back end is down |
|---|
High Availability is offered with any Vertical Connector purchased on top of Celiveo Enterprise.
Full Cache Vs Dynamic Cache
High Availability supports two modes of caching.
- Full Cache
In this mode, the cache downloads the details of all enrolled users from the database/Active Directory (AD). In order to keep the data current, the cache is synced periodically with the back end. This synchronization happens at every scheduled event on the printer. It is possible to fine tune the list of users that shall be downloaded inside a printer cache using the AD filter string. If different printers need different lists of users, the admin just needs to use different AD profiles for printers.
![]()
Full Cache stores details of all users in the cache
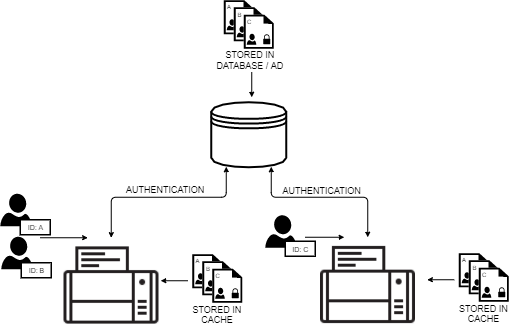
- Dynamic Cache
In this mode, the cache captures your details whenever you authenticate at the printer. The data is purged from the cache if you do not authenticate at the printer for a specified time.
![]()
Dynamic cache stores the details of those who authenticate at that printer

Because Full Cache contains the details of all enrolled users, any user can authenticate at a printer when the back end is offline. However, keeping the cache in sync with the back end can generate significant network traffic, especially in an environment with a large number of users and printers.
Because Dynamic Cache purges cache data when you do not authenticate at the printer for a while, only recent users of the printer can authenticate when the back end is offline. Typically, the printers that do not contain your details are the ones you are least likely to access. As such, Dynamic Cache allows for successful authentication most of the time, while keeping network traffic down.
Cache First Vs Cache Last
You can choose between two authentication methods; authenticate against the cache first or authenticate against the cache last.
 |
 |
| Cache first | Cache last |
|---|
When the Cache First method is enabled, the back end is queried only if your details are not found in the cache. When details are found on the cache, the authentication process becomes much faster, because queries across the network are circumvented, and hence, the impact of network latency is blunted. Consequently, the Cache First method is able to boost performance. The performance gains can be quite significant, especially on corporate networks with geographically distributed branches, where the quality of service (QoS) between branches is not optimal. On the downside, cached details are only as accurate as the most recent sync operation.
For example, If you re-assign the Badge ID of an old user who is currently not existing with the organization, to a new user, and the cached details have not been synced recently, there would be a mismatch as the user details would be already existing in the cache under the old user’s name.
When the Cache Last method is enabled, user details are always authenticated against the back end. The cache is checked only if there is no response from the back end. Because details are always checked against the back end, this authentication method is the more secure of the two. In this mode, the cache acts purely as a failover mechanism.
Tracking and High Availability
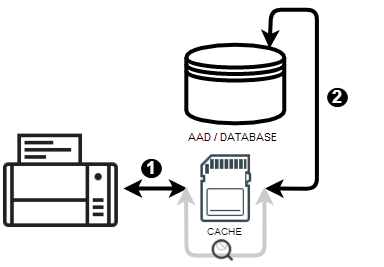
Tracking data is cached at the printer even if High Availability is not enabled. When the connection with the back end is lost, tracking data is stored in the cache. Whenever the connection is restored, cached tracking data is written back to the back end.
Limitations
When the connection to the back end is lost, upon authentication, High Availability checks the cache for the sources of the most recent print jobs. It then queries the source for pending print jobs matching the user details it just authenticated. Upon finding the print job, it “pulls” the print job and prints it. If the computer you are using to send the print job has not used the printer recently, the High Availability cache of that printer will have no record of the computer. As such, it will not be able to “pull” the job from that computer. Accordingly, you may not be able to print a pull print job, if the computer you are on has not recently used that printer.
When Dynamic Cache is enabled, you must authenticate at least once to allow for the cache to capture your details. As such, when the back end is offline, you may not be able authenticate at a printer you have not used before.
If you upgrade the Celiveo Smart Appliance Version file name that ends with OSI.fw, the High Availability cache is purged. Thereafter the cache starts rebuilding from scratch, and requires a while to build the cache to effectively implement High Availability.
For security reasons, Smart Card Authentication support High Availability feature in Dynamic Cache mode with Read Cache Last method only. “Read Cache First” method selection, if configured, will be ignored and no cache will be applied.
How to…
Enable High Availability:
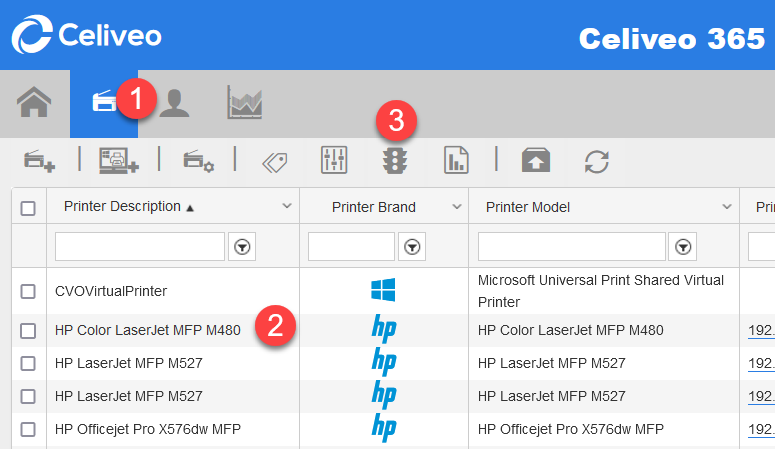
- On the Celiveo Web Admin, at the main menu, click
![]() . The Printer List displays.
. The Printer List displays. - Select the printer you want to enable High Availability for.
Note: The printer must have has Badge Authentication or PIN Authentication enabled.
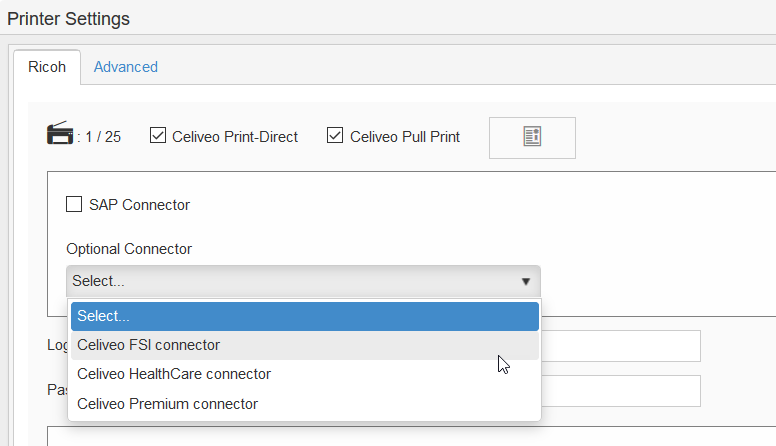
- High availability is supplied by optional connectors for Celiveo Enteprise Edition. In the printer settings, select the desired optional connector.
![]()
- On the printer menu, click
![]() . Access and Rules is displayed.
. Access and Rules is displayed. - Click
![]() adjacent to Access & Rules Profile. The selected Access & Rules Profile is displayed.
adjacent to Access & Rules Profile. The selected Access & Rules Profile is displayed. - Click
![]() adjacent Access Control Rules list. The Access Control Rule Profile is displayed.
adjacent Access Control Rules list. The Access Control Rule Profile is displayed. - In the row corresponding to the Badge Number or PIN Code, click
![]() .
. - Click
![]() adjacent to the Source box.
adjacent to the Source box. - To enable, High Availability, click High-Availability. When the feature is enabled, the button is highlighted in blue.
![]()

Configure High Availability Options:
- Open the Authentication Profile containing the High Availability options.
- Click
![]() adjacent to the High-Availability button.
adjacent to the High-Availability button.
Note: This button is visible only if High Availability is enabled.

- To ensure that details are checked against the cache before the back end is queried, select [Read Cache First] (authenticates faster).
To ensure that details are checked against the back end before the cache is queried, select [Read Cache Last] (more secure).
![]()
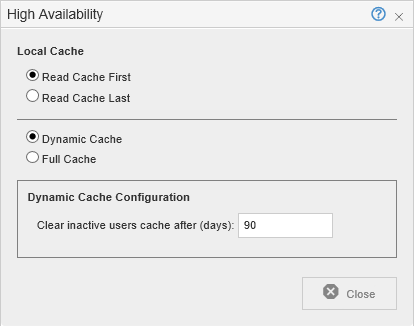
- To provide High Availability only for recent users of the printer, but with low network traffic:
- Select [Dynamic Cache].
- In [Cache Inactivity Timeout], specify how many days to retain user details in the cache.
- To provide High Availability for all users:
- Select Full Cache.
- Under Full Cache Configuration, specify how often, the cache is synced with the back end.
You can choose between monthly, weekly, daily, or a specific date. - Specify a time interval within which sync is performed.
Note: As many printers can attempt to sync at the same time and cause high network traffic, you specify a time interval, rather than a specific time.
Post your comment on this topic.