
![]()
![]()
You enable ID Code authentication by creating an Access Control Rule and assigning the rule to a printer. You however cannot assign an Access Control Rule directly to a printer. Instead, you create an Access & Rules Profile for a printer and add the Access Control Rule to the Access & Rules Profile.
1. Add a New Access & Rules Profile to a Printer
- Select the printer to add the Access and Rules Profile to.
- Click
![]() . The Access & Rules dialog is displayed.
. The Access & Rules dialog is displayed.
![]()

- Click
![]() . The Access and Rules profile is displayed.
. The Access and Rules profile is displayed.
![]()
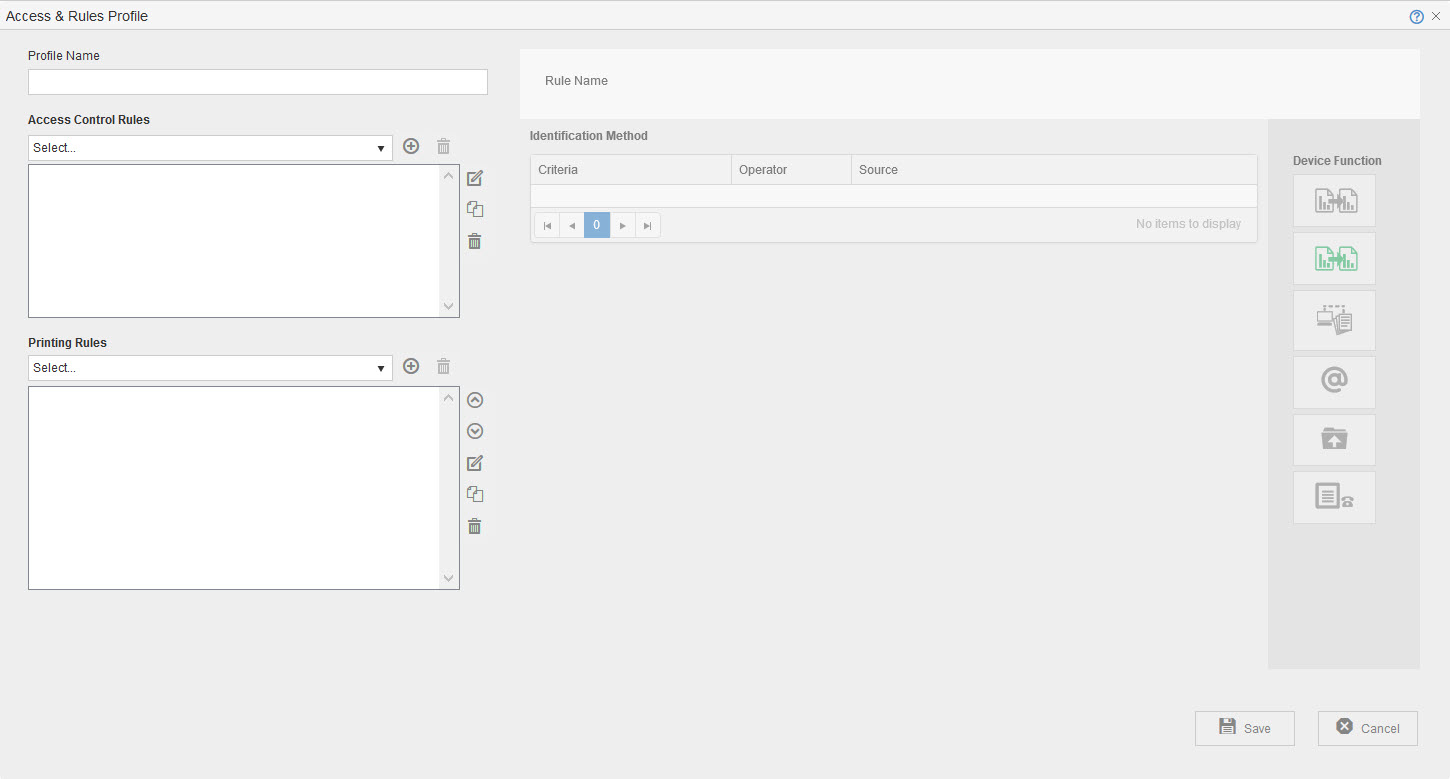
- At [Profile Name], specify a unique name for the Access & Rules Profile.
2. Add a New Access Control Rule to the Access and Rules Profile
- Click
![]() , located in the same row as the [Access Control Rules] drop-down. The Access & Rules Profile displays
, located in the same row as the [Access Control Rules] drop-down. The Access & Rules Profile displays
![]()
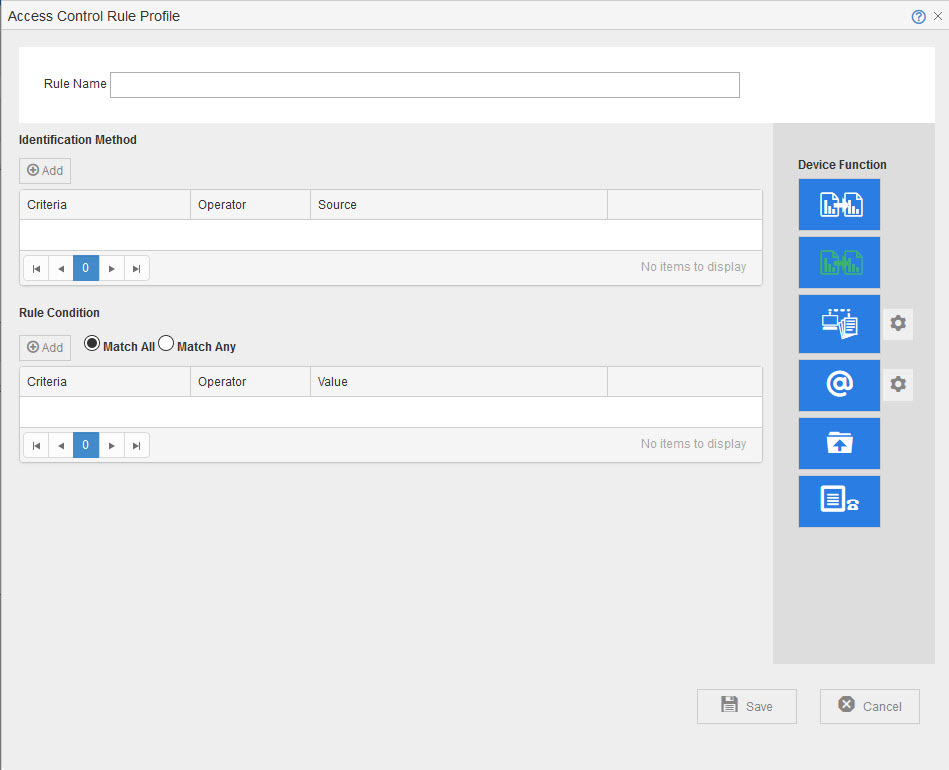
- At [Rule Name], specify a unique name for the Access Control Rule.
3. Add ID Code Authentication as the Identification Method
- Click [Add], located below [Identification Method]. The Rule Definition displays.
![]()
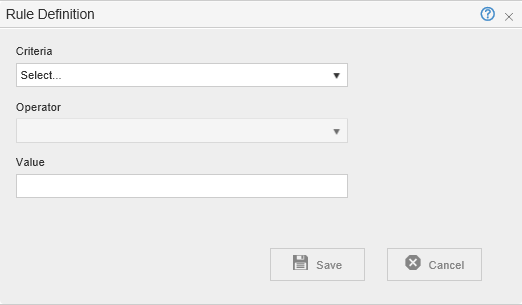
- From the [Criteria] drop-down, select [IDCode].
- From the [Operator] drop-down, select [Is In].
4. Build the Authentication Profile to Validate the PIN
- Click
![]() , located next to the [Source] drop-down. The Authentication Profile displays.
, located next to the [Source] drop-down. The Authentication Profile displays.
![]()

- In the [Profile Name] box, specify a unique name to identify the profile.
- Click
![]() , located in the same row as the [Authentication Profile] drop-down. The Authentication Profile is displayed.
, located in the same row as the [Authentication Profile] drop-down. The Authentication Profile is displayed. - Specify the AD/LDAP query (similar to that of the screen capture shown below) that returns the list of users who are authorized to use the printer.
![]()
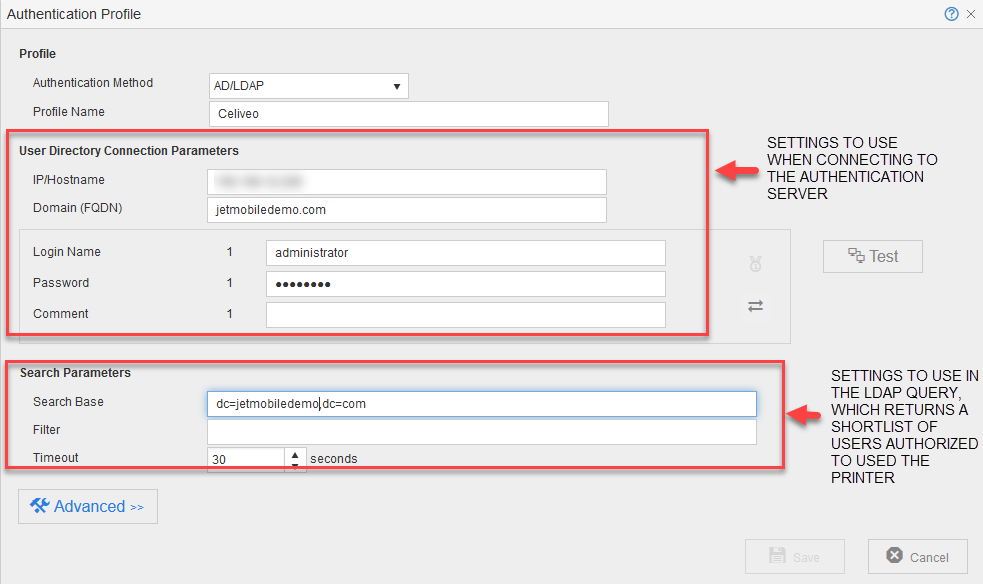
- Click [Test].
If login to the Authentication Server is successful, a message is displayed below the [Test] button. - Click [Save]. You are returned to the Authentication Source Profile.
Dual Service Account System
To avoid any connection error after refreshing/changing the login/password on service accounts used by Celiveo, the administrator can define a secondary set of credentials so that if the default (primary) set is declined by the solution, then the secondary set takes over and prevents the access from being denied.

5. Specify How to Enable Self Enrollment
![]()

- Click [Self-Enrollment].
- Click
![]() next to the [Self Enrollment].
next to the [Self Enrollment].
![]()
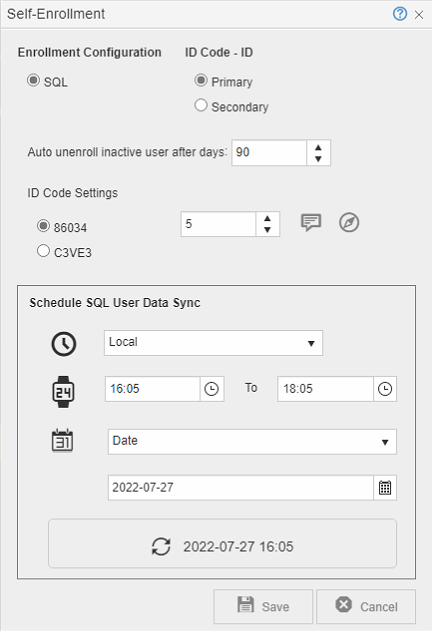
- At [Auto unenroll inactive user after days], enter the number of days.
An enrolled user who has not used the Celiveo system after the specified number of days is automatically removed.
- To enable authentication with a Smartphone using BLE (Bluetooth Low Energy), tick the Use Celiveo Mobile ID checkbox.
- At [ID Code Settings] specify if you want a numeric (made of digits) or alphanumeric (made of digits and letters) PIN. You can also choose the length of your code.
- Numeric ID codes shall not:
- Start with 0
- Be made of consecutive digits, for example, 123456 or 2345
- Be made of repeated digits, for example, 11111
- Have the same digits except one, for example, 51111
- Be made of repeated patterns, for example, 123123
- Alphanumeric ID codes shall:
- Be uppercased, for example, 45ER9
- Always be uppercased when entered on MFP screen, for example, at5p => AT5P
- Have a random mix of digits and letters
- Supported letters can be A to Z except for o and i that can be mixed up with 0 and 1.
- Supported digits can be 1 to 9, no zero
- Alphanumeric ID codes shall not:
- Be lowercased
- Be made of the same characters, for example, AAAA
- Be made of repeated patterns, for example, ABAB or TOTO
- Numeric ID codes shall not:
If you have more than 1000 users, do not use less than 5 digits for the PIN.
- At [Schedule Time Zone], select one option:
Local Apply the time settings of the local machine. UTC Apply the preferred Coordinated Universal Time (UTC) time zone.

- Set the range of time for the data sync to occur.
To avoid a sudden increase in network traffic, the update is scheduled to happen anytime during the specified period. - Set the frequency of the data sync.
Date The data sync occurs on a specific date.
Set the date to start the data sync.Daily The data sync occurs every day during the specified time frame. Weekly The data sync occurs every week on a specific day of the week.
From the drop menu, select the day of the week.Monthly The data sync occurs every week on a specific day of the month.
From the drop menu, select the day of the month.
- Click
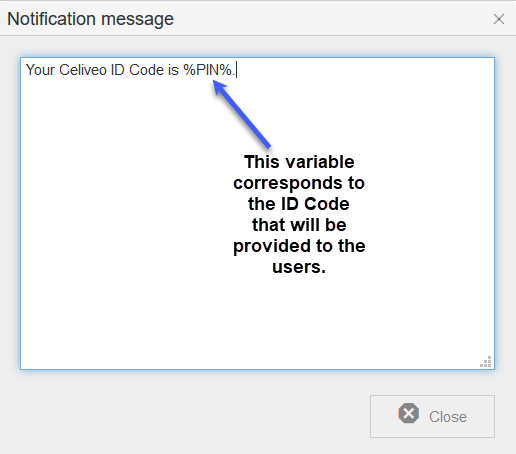
![]() . The Notification Message displays.
. The Notification Message displays. - Specify the text for the notification and click [Close]. This template is used to inform users of their ID code when they enroll.
![]()
- Click
![]() . You are taken to the ID Code generating portal.
. You are taken to the ID Code generating portal.
- Log in using your Windows credentials.
- Note down the URL of the portal. You need to send the link to users to enable them to generate their own ID Codes and enroll themselves.
- Close all dialogs by clicking [Save] to save all settings.
Last modified:
25 May 2021
Post your comment on this topic.